Quick Start 
A good way to start experimenting with the app is to load a sample project and play around.
Currently there are two very basic projects:
- The goddess of fate: A Dialogue based visual novel about the zodiac.
- One Bullet: A Mockup for a point and click game about a heist. Work in progress.
If you want to contribute your project to this section, please make a pull request on the examples repo
Importing a project. 
- Download the example project json file: for this document we will use The goddess of fate: A Dialogue based visual novel about the zodiac.
- Launch the app.
- Go to Project Manager and click on Restore Database from file in a new project
- Enter a name and click ok.
- Select the json file. The project will load.
Sections 
The left sidebar content will change with all available modules of the app, we will quickly visit each one to get a general overview of the features.
Options 
You should setup your username here if you are planning to use it in a team. Other options are self explanatory.
Project Manager 
This is where you can create, load, delete and restore projects. Not much to do here now.
Project Settings 
This is where you can set up project options and metadata and certain default behaviours.
A very important section here is the Export Options page where you can set up different mappings that will be applied when generating the game export as well as what sections will be exported.
Design Documents 
Here is the place where to add documents, notes, story bits, etc. You will notice the loaded project has a “summary” document, if you try to edit it you will not be able to do so. That’s because the document is not “locked for editing”.
Editing documents 
Drafft supports realtime collaboration, with the condition that each user “locks” the document that they are working on to avoid concurrency issues.
Even when using the app as a single user, each document will need to be locked before it being able to be modified.
Go ahead and click the edit button on the toolbar. Some actions on the toolbar like delete or rename will be available now. Also notice that there should be a padlock icon with your username simbolizing the status of the document.
You can double-click on the doc text to lock the document (works also on scripts).
Make some changes to the file and click the save button. The file icon should disappear and the file will be available to other user.
You can have a play exploring the file creation or editing processes, also take a look at the timeline feature if you want. Once ready lets move to the script section.
Scripts 
This is one of the main sections of the app, a script is data that you will provide to your game and it can be written in any language.
A script could be a standalone document or be part of a dialogue tree. Instead of relying on writing int each dialogue tree node, each node will have its own script attached, but more on that later.
You will notice two items in the file tree: goToLibrary is a really simple script executing a command and a special read-only “Dialogues” folder which contains all scripts that are part of a dialogue Documents, lets ignore that for now.
- Select
goToLibraryand double-click on the text area. Press theToggle editor hotkeys panelbutton. This will open a sidebar on the right with some shortcuts, these will be really useful for repetitive tasks like adding speech actions. - Modify
ctrl+4shortcut and add the following:::Narrator:: % deals % damage. - Focus the text area and press
ctrl+4. Each time a%appears in the shortcut it will ask the user for a value. PutMaxand66or whatever you want there.
You will also notice that <PlayDialogueByAlias(area)> and ::Narrator:: are highlighted differently and that is because they are part of the really small Drafft Scripting Syntax. Go have a read on that page document for a quick overview. I’ll wait…
Also note that this script has and id and an alias shown in the script editor footer.
Dialogues 
The script concept can also be applied to dialogues. Drafft will give the chance to design a dialogue tree with the possibility to attach a script to each node. The way of structuring a dialogue tree is up to you, but the intended idea is to do linear logic inside the script, and use the tree as a branching mechanism. This will make the tree less convoluted.
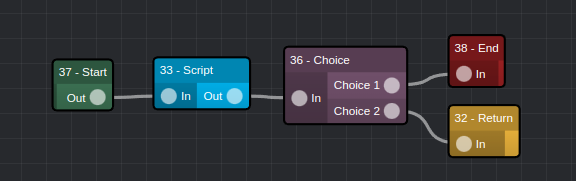
A dialogue tree consist in a series of nodes interconnected (or not). Drafft provides 5 different nodes which should be enough to implement any logic in combination with a script.
Startnode its a1 Outputnode, its intended usage is for the developer to identify where to position the dialogue when starting it.Scriptnode is a1 Input -> 1 Outputnode that carries an associated script. This is intended for running game logic or linear dialogue.Choicenode is a1 Input -> n Outputsnode intended for branching logic.Endnodes is a1 Input onlynode intended to provide a flag on where a branch hit a dead.- Similarly the
Returnnode is1 Input onlynode intended to provide aflags on where a branch hit a dead and should return to the choice node, or any other custom logic. This is to avoid populating the graph with lots of arrows going back.
Even though the script node is intended to provide scripting logic, any node can have a linked script.
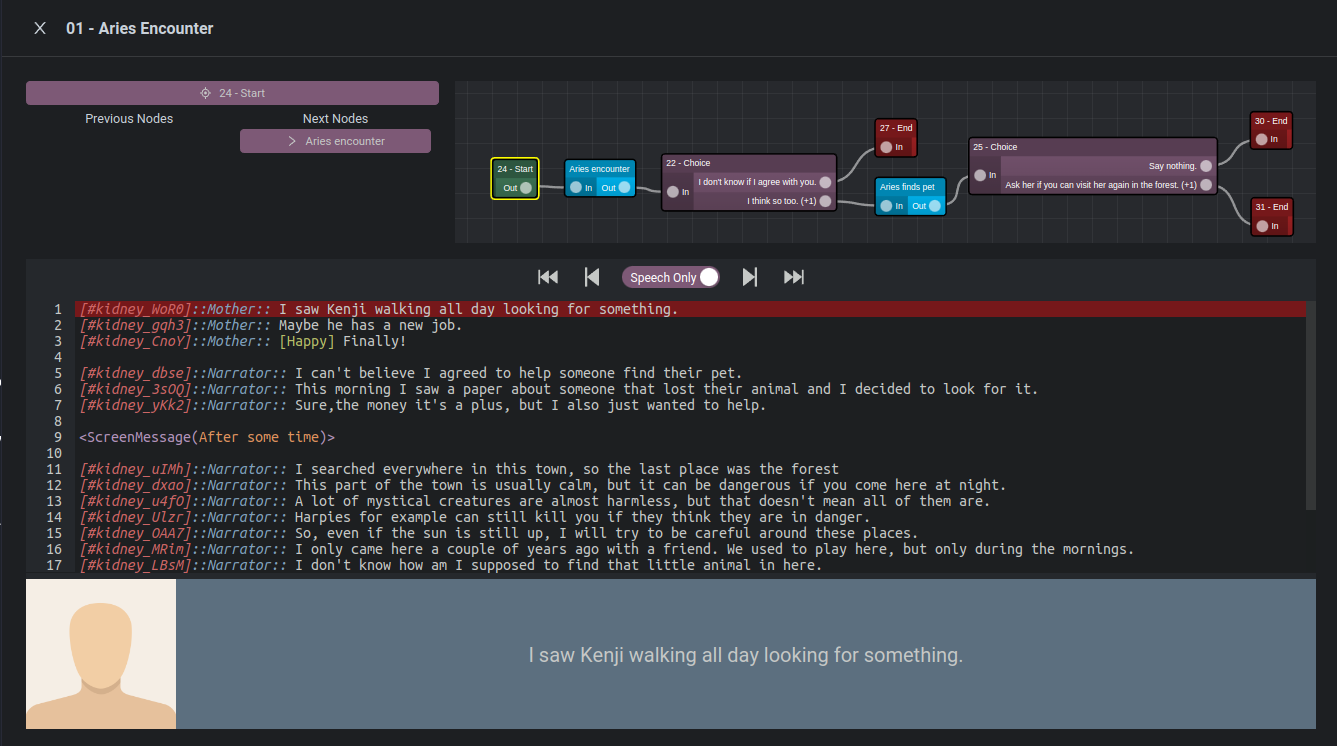
Go to the Dialogues section and load the Aries - 01 - Aries Ecounter dialogue and click each node to inspect the associated script. Feel free to experiment editing and moving/linking nodes.
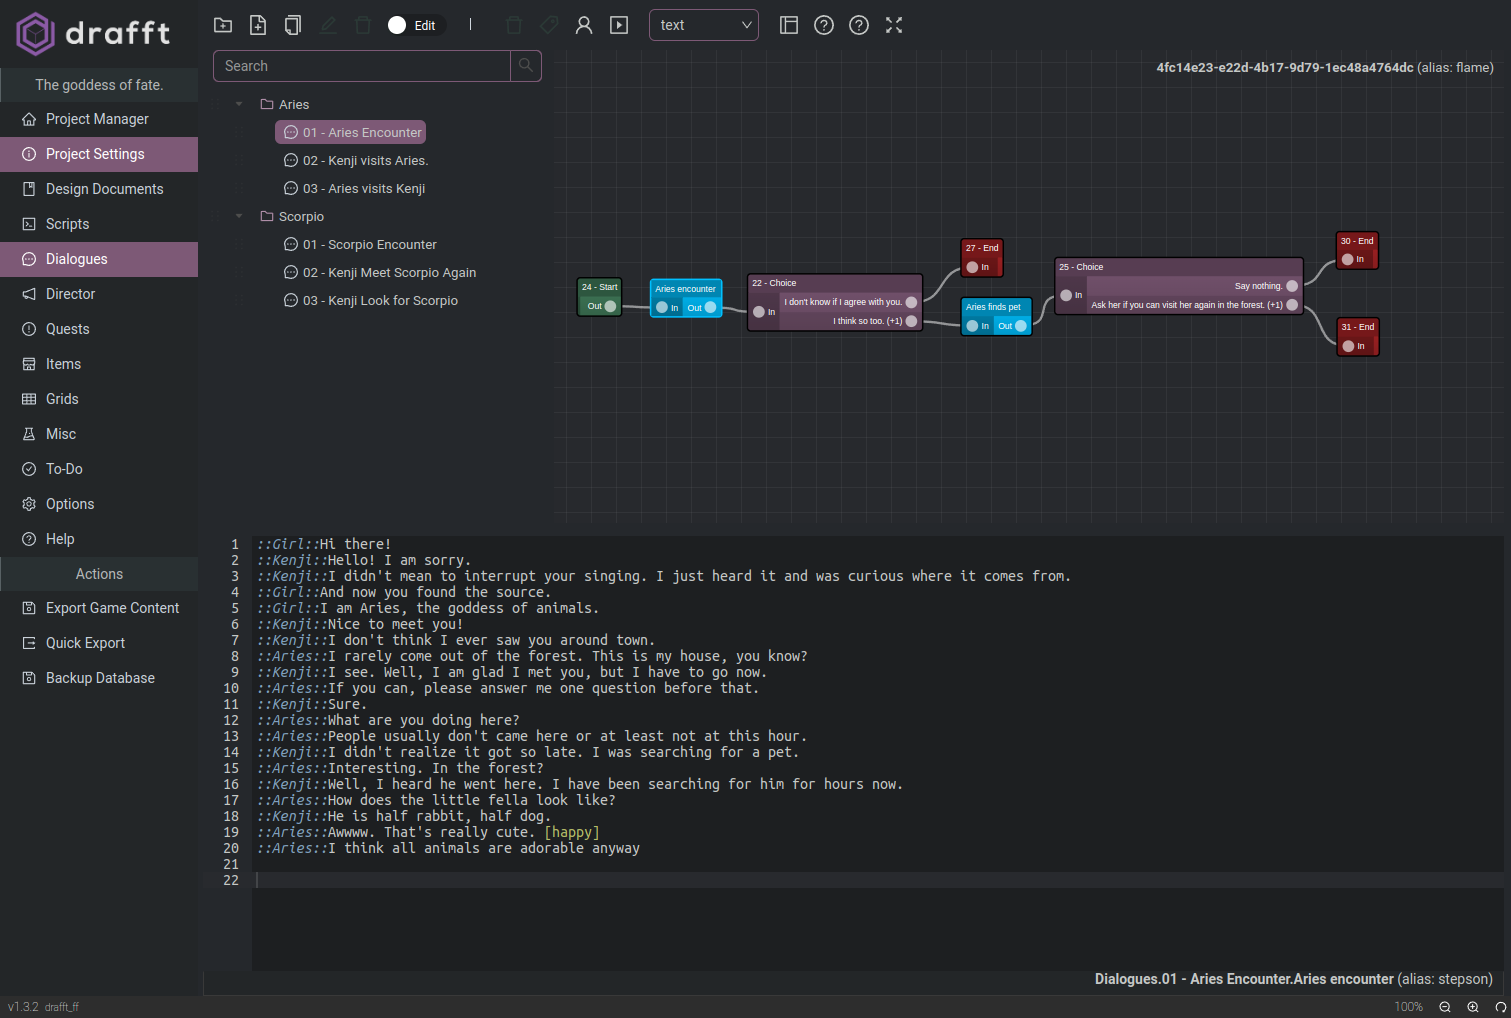
With the document locked for edits, select the first node , the green starting node and add a few lines at the start:
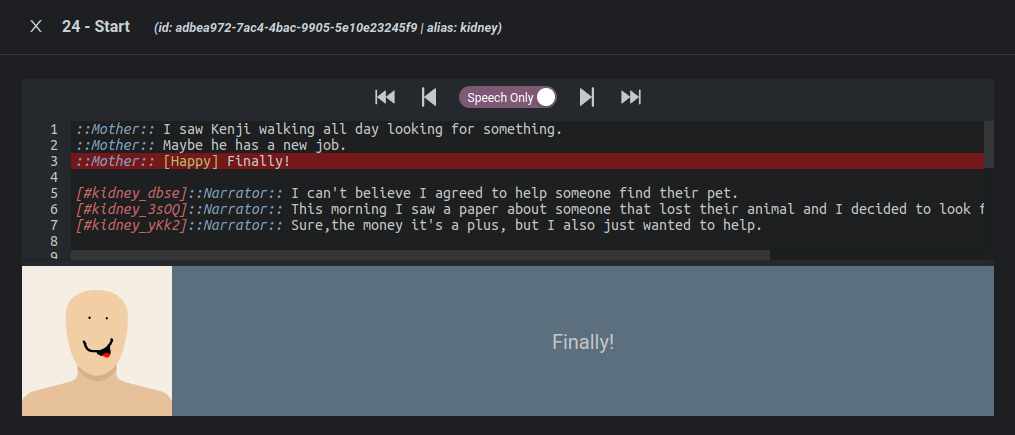
::Mother:: I saw Kenji walking all day looking for something.
::Mother:: Maybe he has a new job.
::Mother:: [Happy] Finally!
Detecting Actors 
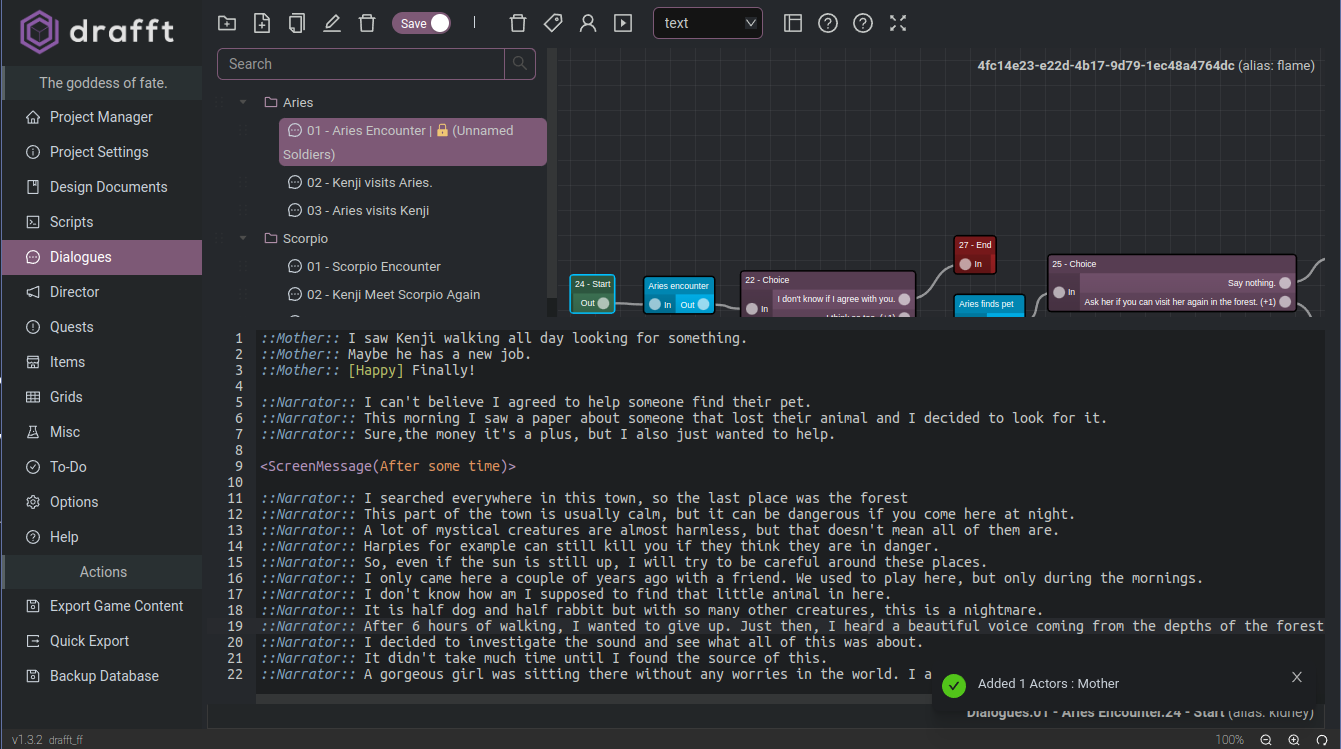
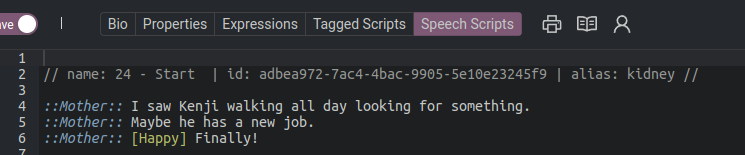
In order to update the Actor database we can simply click the Auto Detect Actors button in the toolbar. Click it, we will come back to this later. You should see a message with the text: “Added 1 Actors: Mother”
Generation Voice Over Tags 
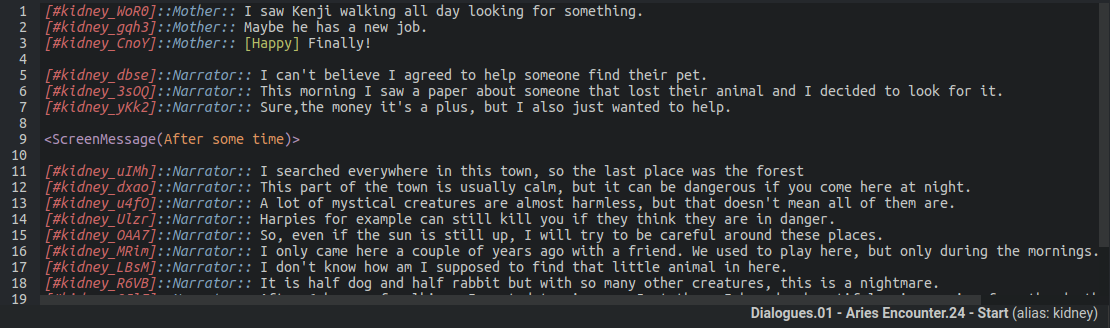
As we are using the Drafft Scripting Syntax (UAF) we can automatically generate a tag for each dialogue line, so in the future we can link our audio files with each line. This has the trade off to have the script filled with tags but on the other hand we don’t need any kind of metadata db for each line which would probably make the editing experience more tedious. This tag can be of format but UAF identifies them with the following format: [#speechTag]::Actor::Actor Line [expression]
In order to keep that short, unique and identifiable , a combination of the script alias and a short uuid is used for the generation. Go ahead a click the “Generate tags for current script” button. A success message should appear.
Reopen the node script to see the changes:
Previewing Dialogue 
Drafft comes with a VERY basic dialogue and script player. With the dialogue selected click the Play Dialogue button.
In this screen basic navigation can be done to debug the dialogue logic.
Another benefit of using Drafft Scripting Syntax is that t can make the previewing process a bit nicer ignoring non-dialogue and getting actors portraits and emotions. The speech only button will only move to ::ActorTag:: lines.
Clicking on the text box will advance to the next line.
Director Section 
In the Director section we will find a list of Actors and properties that we can fill for our game.
You should see Mother was added to the list. If you click on the tree item and lock the document you can add data in the different tabs.
Bio 
Write a biography or any relevant rich text in the bio tab.
Properties 
In this tab you can add plain text or structured data in hjson, json toml. If the latter this data will be serialized as JSON when generating the game export.
Name, age and gender are automatically created at random when a new actor is detected.
Expressions 
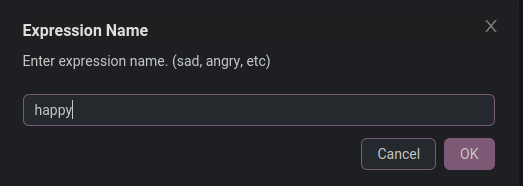
A list of images to use when a script using UAF calls an expression [expression]. In hour example before we added [happy] so go ahead and click on Add Expression an add a picture for the happy expression.
Expressions are saved in lower case in the database, thus the matching is case-insensitive.
We can now go and test our script in the player, but , first, take a look at the remaining tabs.
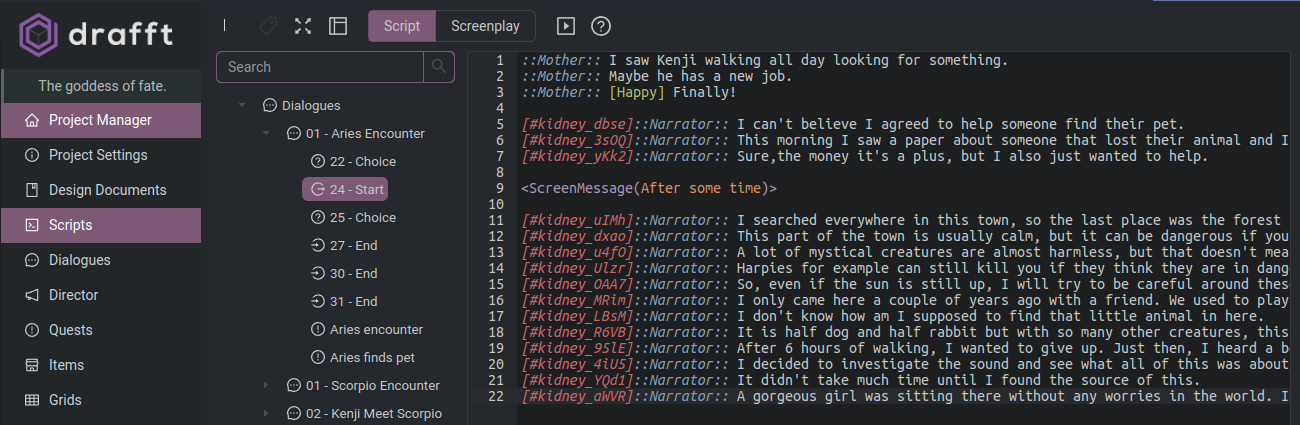
Tagged/Speech Scripts 
These tabs display all scripts associated with an actor. Tagged scripts will only show lines which contains [#tag] tags. Useful for example, to generate exports for voice actors.
You will notice that there is a comment before the lines indicating the script id , alias, and node name.
We can navigate to the dialogue or we can use the node name to identify the script in the script section (Remember, the dialogue node contains a linked script)
There is a special read-only folder inside the script section which includes all the dialogue scripts grouped by dialogue.
This section also contains a script player, but only scoped to the current script. Go ahead an try the new Mother expression.
Screenplays 
While we are here, you can click on Screenplay toolbar button, to see/download the current screenplay in a script format. This particular project does not contains much screenplay comments but there is more info in the docs
To Be continued…
In the meantime, if you need help please visit the Drafft forums